
Key takeaways:
- GET requests let you pull the data you need from APIs and combine it with other sources to power dynamic outputs like live web maps.
- POST requests let you send data to external services, enabling automated workflows.
- Data virtualization in FME Flow turns your workspaces into live, queryable API endpoints that deliver near-real-time data on demand, replacing slow, scheduled ETL jobs.
- You can convert existing ETL workspaces into data virtualization endpoints, adding filtering and caching to make them faster and more flexible without rebuilding from scratch.
- FME handles the full lifecycle: design workflows in FME Form, automate and expose them as APIs through FME Flow, and let any application consume the results via webhooks or data virtualization endpoints.
Most API workflows are heavier than they need to be—over-fetching data, rerunning full ETL jobs for small changes, wrestling with complex authentication setups, struggling to combine API data with other sources, powering dashboards with stale data, or a number of other issues could impede a workflow. Fortunately, these common frustrations can be mitigated with smart workflow design.
FME gives you the tools to query APIs, integrate them, and deliver results through automated workflows. Let’s walk through three approaches that can transform how you work with APIs in FME: GET, POST, and data virtualization. For a deep dive into this topic and live demos, watch our API webinar.
A Quick API Refresher
An API (application programming interface) allows two systems to communicate. It defines how to request data, how to perform actions, and how responses are structured. APIs are powerful because they let systems talk to each other without exposing their internal complexity.
There are five foundational pieces to understand when working with APIs:
- Request — what the client sends
- Response — what comes back
- Endpoint — the specific URL the request targets
- Method — the type of action being performed (GET, POST, PUT, DELETE, etc.)
- Authentication — how the client verifies its identity
In FME, these concepts map cleanly into how you configure transformers like the HTTP Caller or OpenAPI Caller.
Core HTTP Methods at a Glance
GET retrieves data without changing anything on the server, like loading a web page or fetching dashboard data. POST creates new data or submits information for processing, like submitting a form or sending JSON to an API. PUT replaces existing data (typically a full resource update), and DELETE removes data from the server.
When you work with APIs in FME, you’re both calling a URL and choosing an action. Are you retrieving data, or are you modifying it?
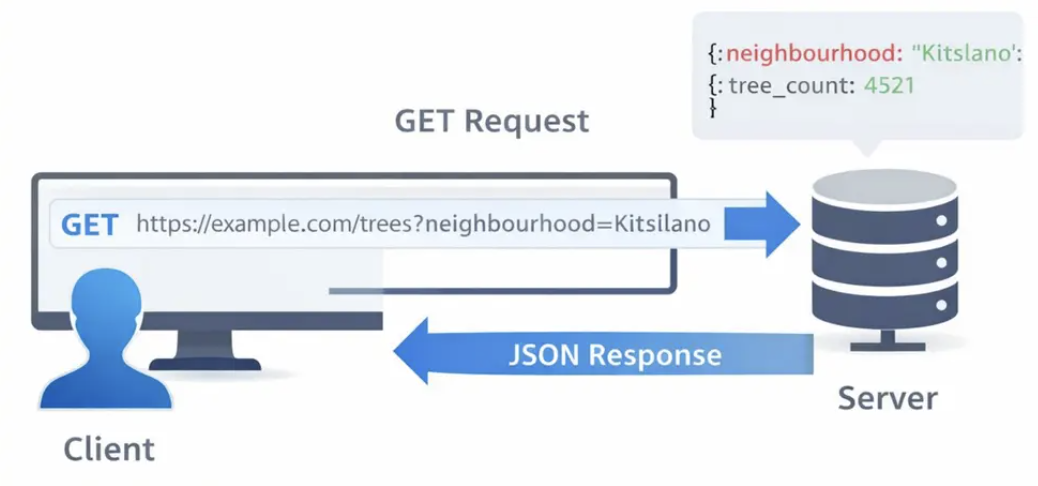
1. GET: Retrieve Only the Data You Need
GET is the most common HTTP method, and for good reason. A GET request retrieves data from a server without modifying anything. It simply asks for information and receives a response. Parameters are sent directly in the URL, which makes GET requests transparent and easy to test—you can often paste a GET URL into a browser and see the result immediately.
Key Properties of GET:
- Safe — doesn’t change any data on the server
- Repeatable — the same request returns the same result
- Cacheable — responses can be stored for reuse
- Transparent — parameters are visible right in the URL
That visibility makes GET extremely useful for filtering. Common use cases include fetching user profiles, searching databases, loading web pages, retrieving API data, powering dashboards, and loading map data.
Example: Building a Dynamic Tree Density Map
To see GET in action, consider a real-world workflow that combines greenway data from the City of Vancouver’s public API with public tree point data to create a dynamic web map showing tree density along greenway segments.

Here’s how the workflow comes together in FME:
Greenway data processing. A Creator transformer kicks off the workflow, and an OpenAPI Caller pulls live greenway data from the city’s API. Since the API returns JSON, a JSON Fragmenter splits the response into one feature per record, and a JSON Extractor pulls out key attributes like segment name and ID. An Attribute Keeper trims the workspace to only the fields needed downstream, and a Geometry Replacer rebuilds the spatial geometry from the JSON content. A buffer is then applied around each greenway segment to define a search area for nearby trees, and a Tiler breaks large geometries into smaller chunks for performance. Finally, a Unique ID Generator assigns a stable identifier to each segment for use as a grouping key later.
Tree data processing. Public tree data is read in via a GeoJSON reader. An Attribute Keeper retains only relevant fields (like common tree name and geometry), and a Tester optionally filters by species if a user-supplied parameter is provided. This means the same workflow can count all trees or just cherry trees, for example, without any changes to the logic.
Spatial join and aggregation. A Spatial Filter determines which trees fall inside which buffered greenway segment. A Statistics Calculator then aggregates the results, counting the total number of trees per segment by grouping on the unique segment ID. A Feature Merger attaches those counts back to the original greenway features, and an Attribute Manager handles final cleanup so the output fields match what the web map expects. The result is written as a GeoJSON file.
From workspace to live web map. The workspace is published to FME Flow, where a webhook turns it into a callable URL. Any application (e.g. a website, dashboard, or mobile app) can trigger the workspace simply by calling that URL. FME Flow automatically associates a secure API token with the webhook, with options for expiration dates and permission management. A simple HTML page built with Leaflet loads the map, calls the FME Flow webhook, and styles each greenway segment based on its tree count: lighter colors for fewer trees, darker colors for more. Users can filter by tree species and adjust the search distance, all powered by the same workspace running against live data.
GET Best Practices
- Take advantage of the OpenAPI Caller. It’s one of the most powerful tools in FME for connecting to APIs.
- Handle multiple data sources. You can combine API calls with local files (like GeoJSON) in the same workspace.
- Parse and normalize data early. This improves performance and keeps your workspace clean.
- Apply filters and aggregation strategically. Use parameters to make your workspace flexible — filter by species, adjust buffer distances, or add other criteria without changing the underlying logic.
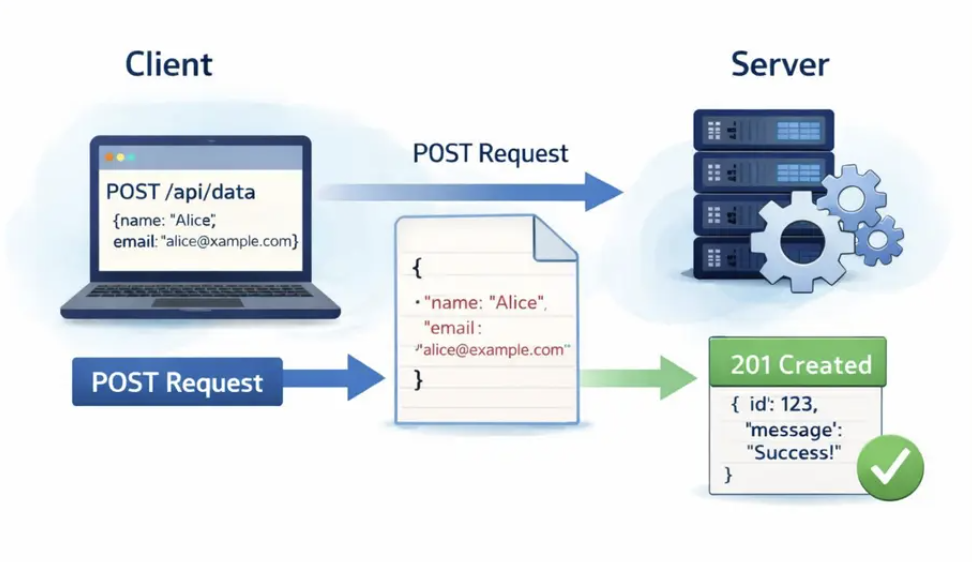
2. POST: Submit Data and Trigger Actions
While GET is about retrieving data, POST is about sending data to a server. POST is an HTTP method used to create new resources or submit data for processing. When you fill out a registration form, place an online order, or submit information through an API, you’re typically using a POST request.
A key characteristic of POST is that data is sent in the request body, not in the URL. This allows you to send structured data like JSON or handle larger, more sensitive information more securely than you could with a GET request.
How POST works:
- The client sends a POST request to a specific server endpoint
- Data is included in the request body (JSON, form data, or another payload format)
- The server processes the data according to its business logic
- The server returns a response with an HTTP status code (like
201 Created) and often some confirmation data
When to Use POST
- Creating something new on the server (a new account, a new record)
- Uploading files like images or documents
- Submitting forms (contact forms, surveys, registrations)
- Placing orders or making reservations
- Triggering any action that changes data on the server
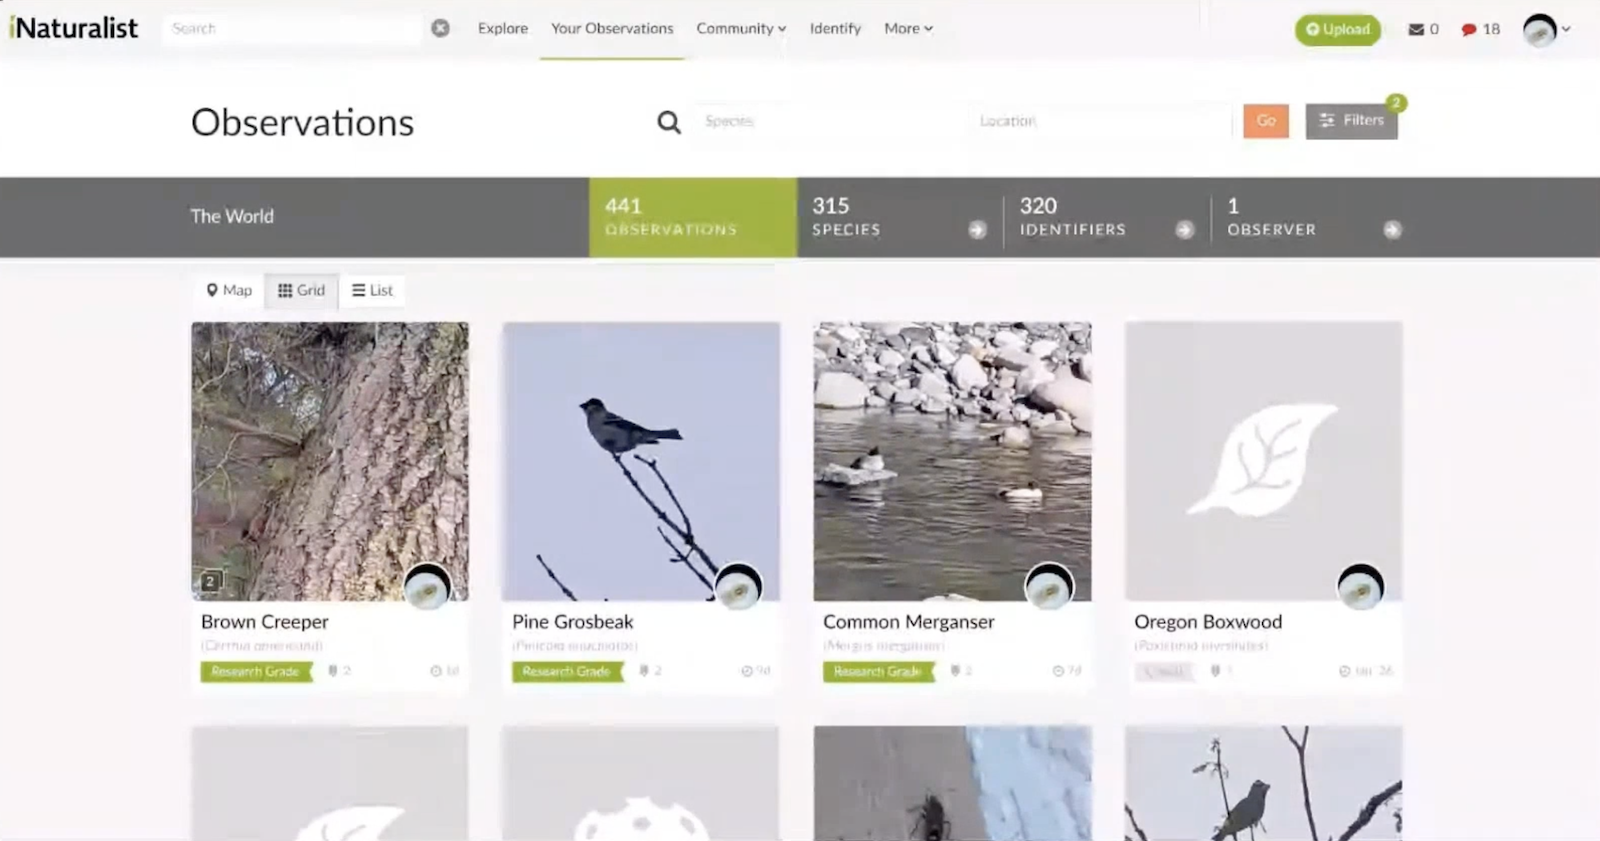
Example: Automating Citizen Science Observations
For a hands-on example, consider automating the process of uploading nature observations to iNaturalist, a citizen science platform for identifying flora and fauna.
The workflow starts with an automation in FME Flow: a Resource Directory Watch monitors a folder for new images. When a photo is dropped in, the automation detects the file path and passes it as a parameter to a workspace.
Step 1: Read and extract metadata. The workspace reads the JPEG image, which — because it was taken on a phone — contains rich metadata including GPS coordinates, timestamp, and other EXIF data. The geometry is extracted to create a point representing where the photo was taken.
Step 2: Identify the species (POST with multipart upload). An HTTP Caller sends the image to the PlantNet API using a POST request with multipart form data. The request includes the image file and a parameter indicating which part of the plant is shown (flower, leaf, etc.). The API returns a list of possible species with probability scores — in this case, Pacific Trillium at 80% confidence. A Sorter and Sampler extract the top result.
Step 3: Create the observation (POST with JSON body). A second HTTP Caller sends a POST request to the iNaturalist API with a JSON body containing the species name, coordinates, and date. This creates a new observation record and returns an observation ID.
Step 4: Attach the photo (POST with multipart upload). A third HTTP Caller sends another POST request to a separate iNaturalist endpoint, uploading the original photo and linking it to the observation using the ID from the previous step.
The result: drop a photo into a folder, and within seconds the plant is identified by AI and the observation is published to iNaturalist — complete with species name, location, and image.
POST Best Practices
- Always check the API documentation for the required body format. Some endpoints expect JSON; others need multipart form data.
- Test with a small sample before scaling up to hundreds or thousands of requests, especially if you’re working with rate limits or daily quotas.
- Store API tokens securely. Don’t hard-code them into workspaces where they could be exposed.
3. Data Virtualization: Query APIs on Demand, Not on Schedule
Data virtualization is a feature in FME Flow that lets you create secure, queryable API endpoints from FME workspaces. Instead of running a scheduled ETL job that extracts, transforms, and loads data into a staging area, data virtualization pulls data from the source in real time, transforms it on the fly, and delivers it directly to the consumer.
It supports full CRUD operations (create, read, update, delete), OpenAPI documentation, caching, and asynchronous processing. This is what lets you bring the full power of FME’s transformation capabilities to your applications as a live service.
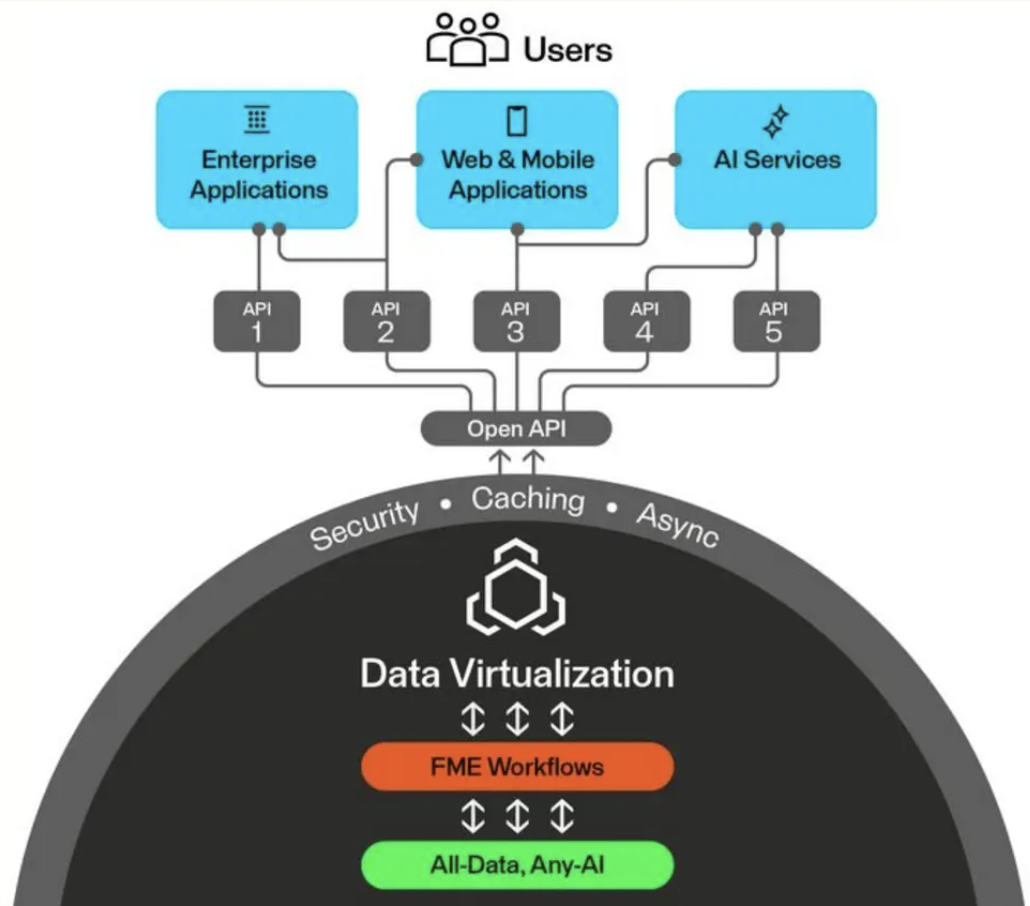
Why Use Data Virtualization?
- Avoid storing multiple copies of data. No more duplicates in staging tables or intermediate files.
- Create a single access layer that can be shared among many users and applications.
- Power dashboards, live maps, on-demand lookups, and lightweight integrations with fresh data.
Traditional ETL vs. Data Virtualization
| Traditional ETL | Data Virtualization | |
|---|---|---|
| Data freshness | Controlled by schedule (hourly, daily) — data can be stale by the time the job finishes | Near real-time, pulled directly from the source |
| Complexity | Large workspaces moving lots of data, often across multiple jobs | Query data at the source, take only what’s needed through filtering |
| Storage | Requires staging tables, intermediate files, or database loads | No persistent storage (except caching) — data is held in memory, delivered, then gone |
Example: A Wildfire Management API
To see data virtualization in action, consider building a real-time API for wildfire management. The goal is to provide easy-to-query information about active fire boundaries and evacuation zones — information that needs to be current, flexible, and fast.
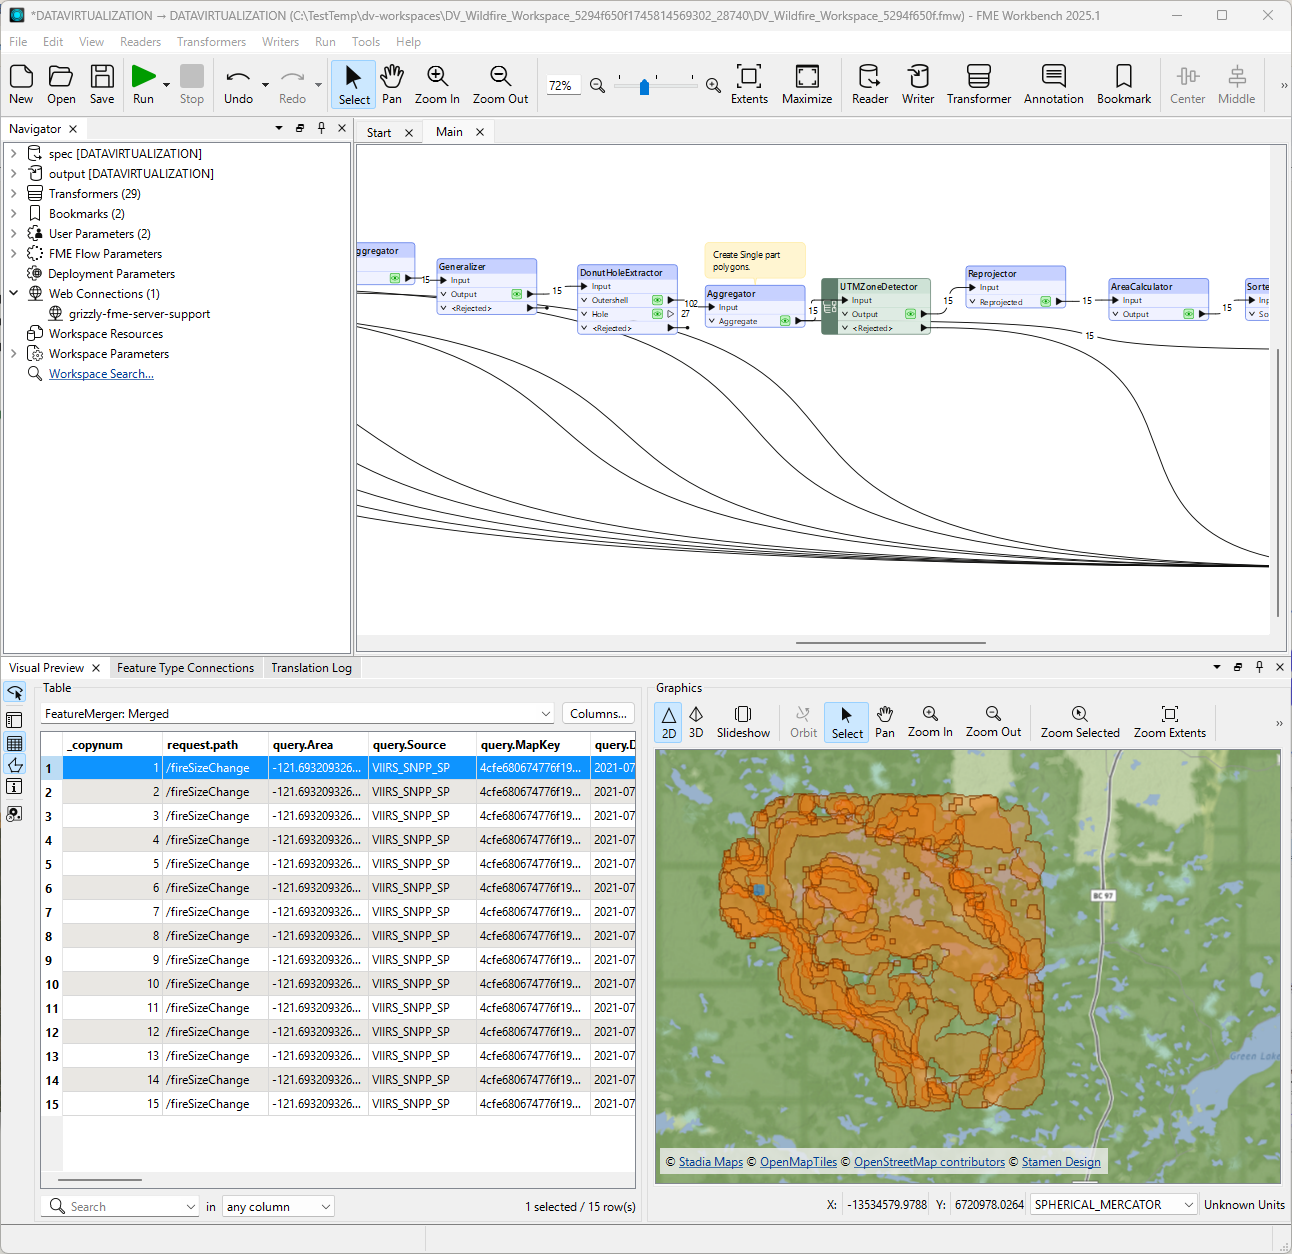
The traditional approach. A large ETL workspace reads thermal anomaly detection points from a CSV, converts them into wildfire boundary polygons, and loads them into a Postgres database. It also reads land parcel data, buffers the fire boundaries at one-kilometer and five-kilometer distances, identifies affected parcels, and writes evacuation areas to another database table. This workspace processes millions of records for an entire province and takes a long time to run. The data may not be in the final form needed by applications, and it’s potentially out of date by the time the job finishes.
The data virtualization approach. The same transformation logic is repackaged into a data virtualization workspace with multiple endpoints — for example, one for fire boundaries and one for evacuation areas. Each endpoint accepts parameters that allow consumers to filter results: parcel class, evacuation status, and a bounding box for spatial filtering.
The key difference is efficiency through routing. When a consumer requests fire boundaries, the workspace only runs the boundary-creation logic and skips the evacuation analysis entirely. When evacuation areas are requested, the full pipeline runs. A test filter at the beginning of the workspace determines which endpoint was called and routes the data accordingly.
Adding write operations. Data virtualization isn’t limited to read-only queries. In the wildfire example, a POST endpoint accepts a parcel name and generates a PDF evacuation notice, storing it in a database. A separate GET endpoint allows field teams to retrieve that notice later using just the parcel name. This turns the workspace into a complete service layer — not just a data source.
Error handling. When something goes wrong (like requesting a notice for a parcel that doesn’t exist), the workspace detects the condition (zero matched records), creates a custom error message, and returns it with an appropriate status code. Consumers get a clear explanation of what went wrong and what to do differently.
Caching. For endpoints that are called repeatedly with the same parameters, caching dramatically improves performance. A cached response returns almost instantly because the workspace doesn’t need to run again. When the cache is purged, the next request runs the full workspace. This reduces system load and frees up processing engines for other jobs.
Documentation and deployment. FME Flow automatically generates an OpenAPI specification for your data virtualization endpoints, complete with parameter descriptions, expected responses, and status codes. This specification can be shared with other teams or organizations, and it can be consumed directly by the OpenAPI Caller in FME or any other API client.
Data Virtualization Best Practices
- Filter early and often. Use WHERE clauses and spatial filters to minimize the data processed per request. This is what gives data virtualization its speed.
- Use caching to reduce system load, especially for requests with repeated parameters. Cached responses don’t consume processing engines.
- Provide rich metadata in your OpenAPI documentation so consumers know exactly how to use your endpoints.
- Return meaningful status codes and concise error messages so consumers understand what went wrong and how to fix it.
Putting It All Together
FME makes it straightforward to connect to virtually any REST API. Whether you’re pulling data with GET, pushing data with POST, or serving transformed results through data virtualization, the platform gives you the tools to work with APIs precisely and efficiently.
Here’s the progression:
- GET lets you retrieve exactly the data you need from external APIs, combine it with other sources, and deliver dynamic results through webhooks.
- POST lets you send data to external services — creating records, uploading files, and triggering actions as part of automated workflows.
- Data virtualization lets you turn your FME workspaces into live, queryable API endpoints that replace heavy batch ETL jobs with on-demand, near-real-time data services.
Together, these approaches let you build flexible architectures that adapt as your needs change. Instead of moving all the data all the time, you can query what you need, when you need it, and deliver it exactly where it’s needed.
Resources to Get Started
- Getting Started with APIs Tutorial
- Data Virtualization Tutorial
- FME Academy (free courses, including the 90-minute FME Accelerator)
- FME Community