Data Restructuring Tips


Hi all,
My favourite part of FME training is the session introducing Data Transformation. We split it into two parts: transforming the content of data (which uses transformers to alter geometry and attributes), and transforming the structure (schema) of data.
If you haven’t attended our training you may not have considered data restructuring (reorganizing is another good word) as part of FME’s data transformation capability. But looking at it in this light helps to integrate it into a more understandable framework – and making complex issues easy to understand is what our training is all about.
Anyway, to get you started on data restructuring, here are some useful tips based on content from the course.
Background
You can divide the two sides of any transformation process into “what you have” and “what you want”.
With FME the “what you have” is defined in your workspace as the source schema (model).
The “what you want” is defined as the destination schema.
By default the destination schema is identical to the source, so that any quick translation produces exactly the same input as output (format permitting).
So to restructure data the two steps are:
- Edit the destination schema to really be “what you want” (schema editing)
- Connect the source to deliver the correct data to the destination (schema mapping)
Simple, eh?
Attribute Restructuring
Let’s take a basic example from the training course – calculating the average area of a set of polygons – and use it to illustrate how to best restructure attributes. Here’s the original workspace with the attribute list expanded:
By expanding the attribute list you can see what attributes exist and where they are mapped.
Light grey lines denote attribute mapping. If you collapse the attribute list you will hide this mapping, and never be able to tell what is/isn’t connected. Worse, you can sometimes disconnect attribute mapping without meaning to, and would never know because the mapping (or lack of) is hidden.
Remove excess attributes
.
My first step is to tidy the canvas by removing attributes I won’t need. This makes the editing process easier, partly because the canvas is less cluttered but also because Workbench has fewer connections to track and will respond quicker. Also, with fewer attributes to cache, the translation process itself will be more efficient.
I only have one attribute to remove, but I’ll do it anyway because it’s good practice.
Quick renaming can be carried out in the canvas
.
Part of “what I have” is a source attribute ‘name’.
Part of “what I want” is this renamed to ‘ParkName’.
It was actually a recent trainee who pointed out that if I edit the attribute name in the Feature Type properties dialog, then the attribute mapping is lost. But if I double-click the attribute and edit the name, then the mapping remains.
However, this only happens when the light grey line is there. Folk will tell you that this line isn’t important because attributes are mapped anyway, provided they have the same name. That’s true – but the above shows one case where these lines are important.
Drag and Insert Preserves Attribute Mapping
.
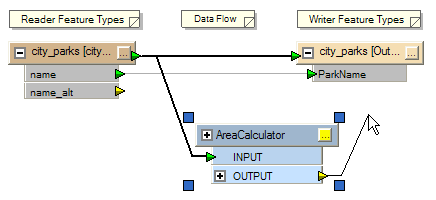
Now I want to add an AreaCalculator transformer. If I make manual connections like this:
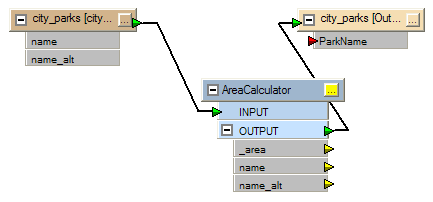
…then the attribute mapping is again lost…
But if I use the drag-n-insert (pink dot) functionality…
…then it is preserved.
Correctly name your attributes from the start
.
Another part of “what I want” is an attribute called ParkSize (the polygons represent parks). Here is what it looks like when I’ve added it:
Now I could map the default AreaCalculator output – an attribute called _area – to the destination schema. But – as I mentioned – sometimes you can unintentionally lose such mapping.
So, far better is to edit the AreaCalculator parameters to create the correctly named attribute at source. Then I don’t need to map anything because FME carries it through to the output attribute of the same name.
Use Replace With AttributeCopier
.
In a similar vein to the above, it’s better to rename attributes on the input schema, to match the destination schema, rather than rely on manual attribute mapping. But manual mapping is more visually intuitive than an AttributeRenamer or AttributeCopier transformer.
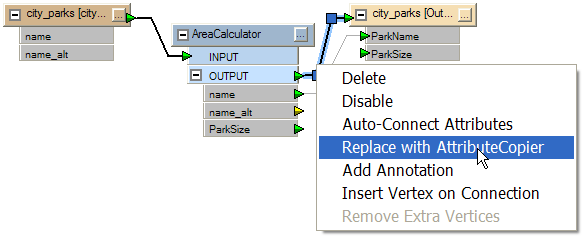
So, to get the best of both worlds, we created the ‘Replace with AttributeCopier’ function. Now you can map attributes visually, then right-click, choose the ‘Replace with AttributeCopier’ function…
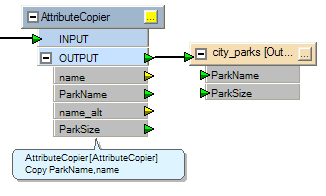
…and get an AttributeCopier automatically filled in with your mappings…
These were just a few tips and tricks relating to restructuring data using FME. I’ll probably post another time on aspects other than attributes, though you can get the full lowdown immediately by signing up for an FME training course!
100 Things to Do with FME!
Here’s another in my list of 100 different uses for FME.
Number 4 (of 100): Install our first ever FME Service Pack, then use it to read and write AutoCAD® Map3D 2011 format datasets.


